A More Productive CLI Experience with zsh, fzf, and tmux
In the movies there is always some guy doing all sorts of hacker stuff in a terminal emulator. “So cool,” you think to yourself.
You decide you too can be this cool. You install some flavor of Linux, BSD, or macOS. You fire up a terminal emulator, and find … desolation and loneliness.

This will not suffice. Not only does it not look cool, but if you spend any non-trivial amount of time at the command line the default shell setup will have you doing a lot of repetitive and tedious work as you navigate commands, documents, and whatever you’re working on. We must improve this experience, but where to start?
Let’s start by itemizing a few complaints of most default shells:
- no command suggestions based on history
- basic history search (ctrl-r)
- logging off means everything you’re working on stops
- limited color and visual hooks
- single view, i.e., open another terminal to do two things
There are many more, but you get the idea. It’s limited. So let’s change that.
(As a quick aside, I must acknowledge that the fish shell does most of these with no configuration required. If you don’t care how it works, and just want a better shell experience, check it out. What I outline below is a bit more work to start, but far more expandable as you dig deeper.)
Zsh: The Z Shell
There are two shells you’ll find almost anywhere you’re looking for advanced shell stuff: bash and zsh. I prefer zsh. They mostly can accomplish the same things, but I like some of the more advanced features in zsh.
Install zsh
I’m installing zsh(1) using FreeBSD. You may need to tweak slightly for other OSes. Just use whatever package manager your OS provides.
pkg search zshzsh-5.9_2 The Z shell zsh-autosuggestions-0.7.0 Fish-like autosuggestions for Zsh zsh-syntax-highlighting-0.7.1,1 Fish shell syntax highlighting for Zsh
You’ll see more results when you search, but these are the ones we want. Let’s install them.
pkg install zsh zsh-autosuggestions zsh-syntax-highlighting
Get the path to zsh, and change your default shell (my user name is markmcb).
which zsh/usr/local/bin/zshchsh -s /usr/local/bin/zsh markmcb
Now exit/logout and log back in. You should see something like.
This is the Z Shell configuration function for new users,
zsh-newuser-install.
You are seeing this message because you have no zsh startup files
(the files .zshenv, .zprofile, .zshrc, .zlogin in the directory
~).  This function can help you with a few settings that should
make your use of the shell easier.

You can:

(q)  Quit and do nothing.  The function will be run again next time.

(0)  Exit, creating the file ~/.zshrc containing just a comment.
     That will prevent this function being run again.

(1)  Continue to the main menu.

--- Type one of the keys in parentheses ---
Type q. That’s it! You’re a zsh user.
Enable zsh syntax highlighting, and autosuggestions
To start, let’s make a few quick edits to ~/.zshrc
(which doesn’t exist, we’ll be creating it new).
# Enable syntax highlighting and autosuggestions
source "/usr/local/share/zsh-syntax-highlighting/zsh-syntax-highlighting.zsh"
source "/usr/local/share/zsh-autosuggestions/zsh-autosuggestions.zsh"
Save that file, and then exit to a prompt.
Note: The exact file locations are OS dependent. For example, in most
Linux distributions you’ll find them in /usr/share/zsh. If you can’t
find them, try find /usr/ -name "zsh*" to help locate
them.
Let’s try a few commands now and test what we’ve just enabled.
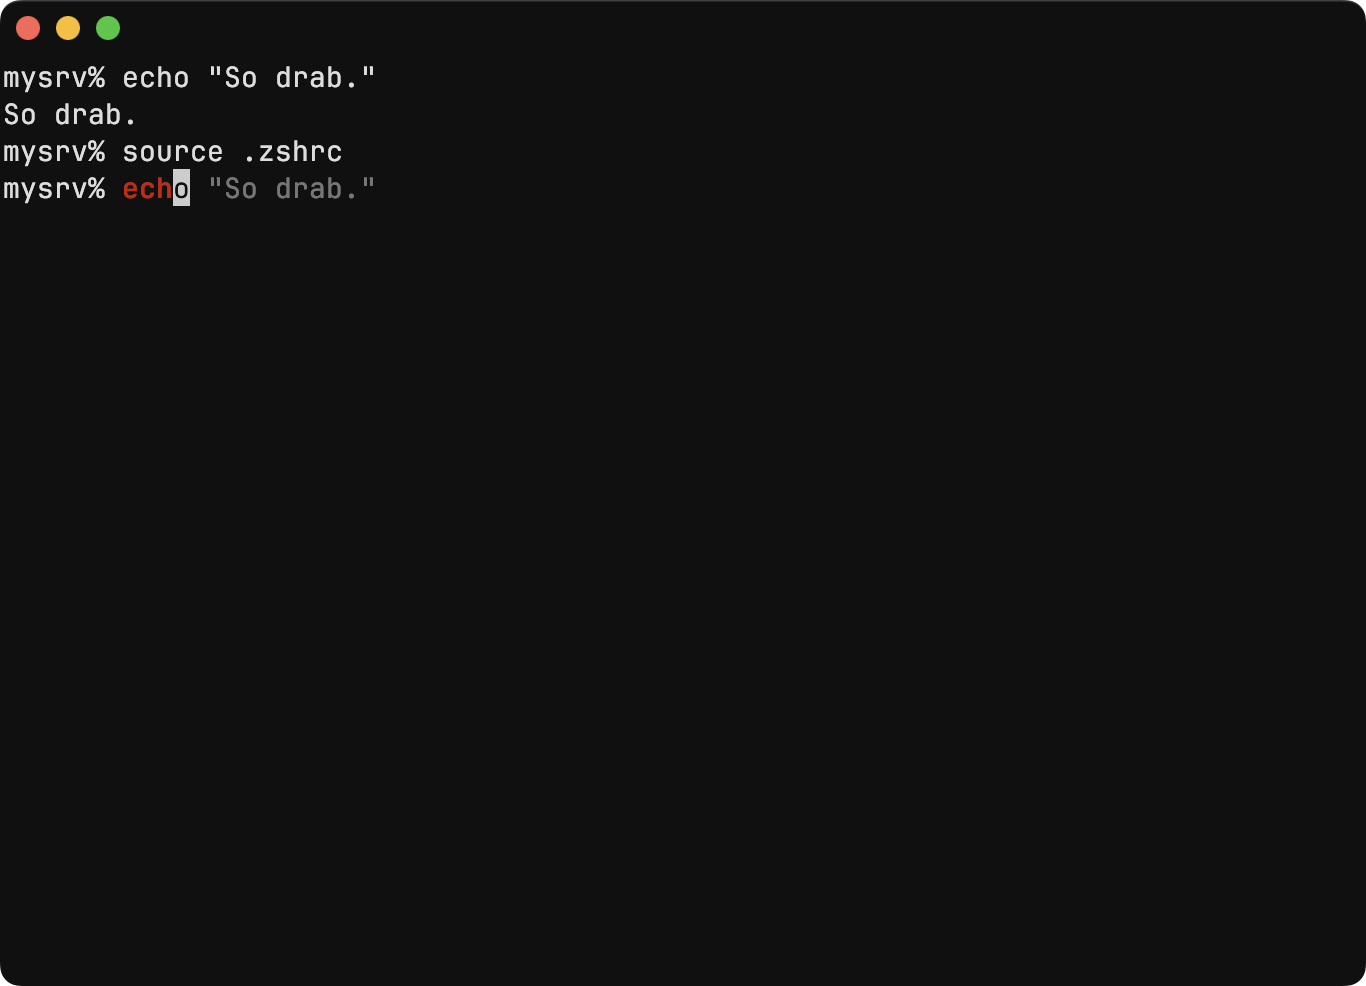
Note the first echo has no color. That’s because we’re
still using an empty .zshrc config. The next line
source .zshrc will read the new config file and incorporate
changes into zsh. Immediately after doing this, we see red text as we
type, and a grayed out suggestion.
The red is from zsh-syntax-highlighting. It will turn
green when what we’ve typed matches a command in our path. So
ech is red but echo will turn green because it
matches a built-in zsh shell command.
The gray shows up because everything we’ve typed so far matches at
least one line in our history. In this case, it’s the line we typed
immediately before. After only typing ech let’s press the
right arrow key and see what happens.
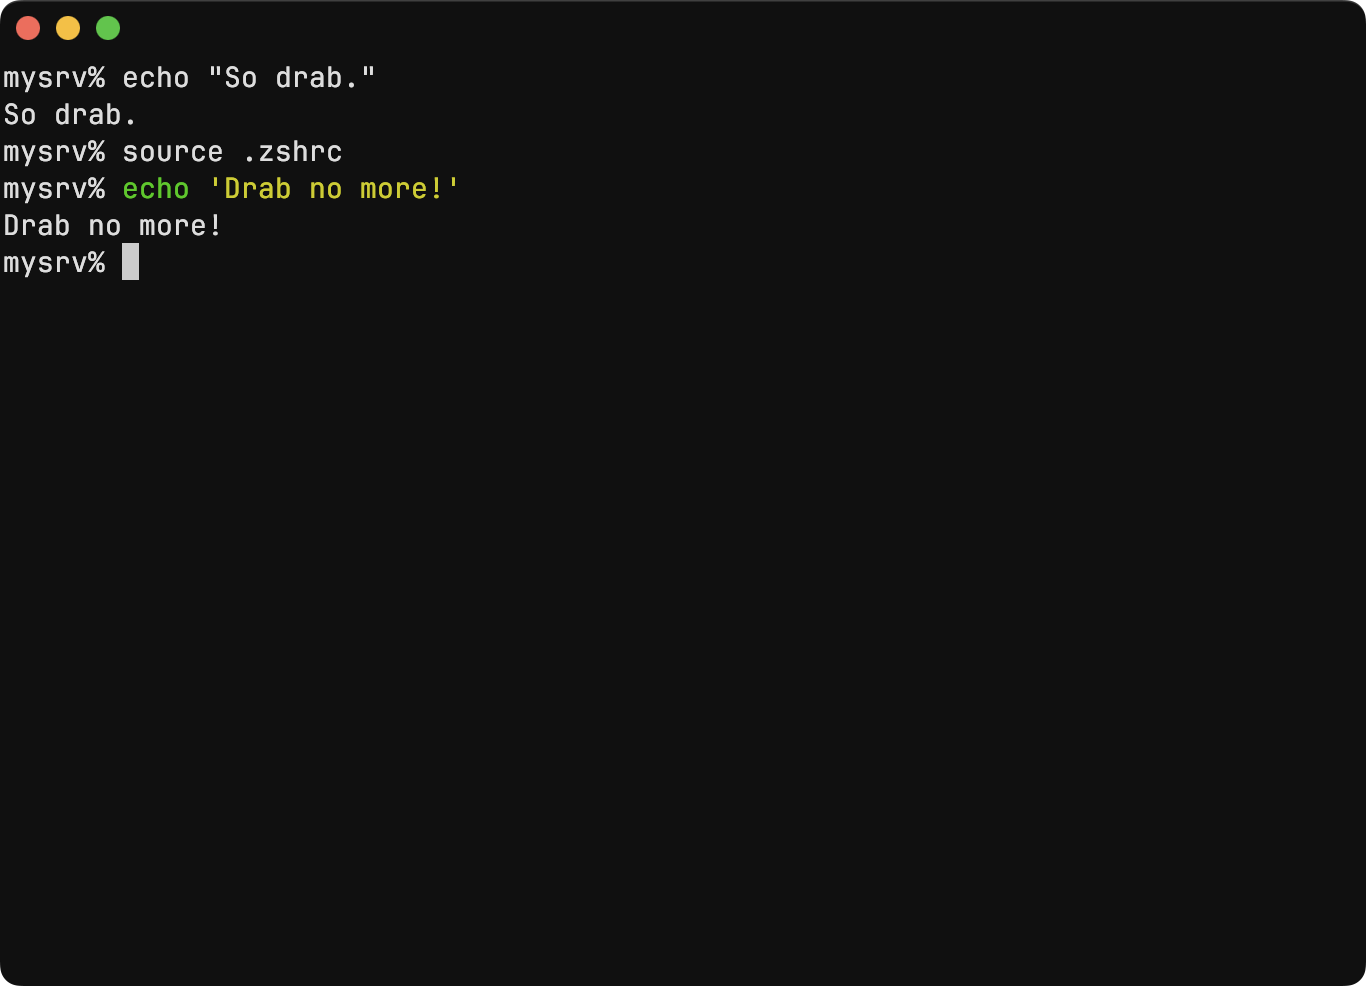
When we pressed the right arrow, we essentially said “yes zsh, let’s use your suggestion” and the command completes. It’s not executed yet, so you can still edit it. I edited it to say, “Drab no more!” When it’s to your liking, hit enter to execute the command.
zsh command history
A few other simple recommendations I suggest to enhance how zsh handles your history are the following. Just append them to your .zshrc file.
# zsh essentials
HISTFILE=".histfile"             # Save 100000 lines of history
HISTSIZE=100000
SAVEHIST=100000
setopt BANG_HIST                 # Treat the '!' character specially during expansion.
setopt EXTENDED_HISTORY          # Write the history file in the ":start:elapsed;command" format.
setopt INC_APPEND_HISTORY        # Write to the history file immediately, not when the shell exits.
setopt SHARE_HISTORY             # Share history between all sessions.
setopt HIST_IGNORE_DUPS          # Don't record an entry that was just recorded again.
setopt HIST_IGNORE_ALL_DUPS      # Delete old recorded entry if new entry is a duplicate.
setopt HIST_IGNORE_SPACE         # Don't record an entry starting with a space.
I won’t go through all of these in detail, but check out zshall(1) for information on each of these options and many more.
fzf: a command-line fuzzy finder
By default, most shells have a very basic way to search your command history. fzf expands this greatly with smarter matching and a better interface.
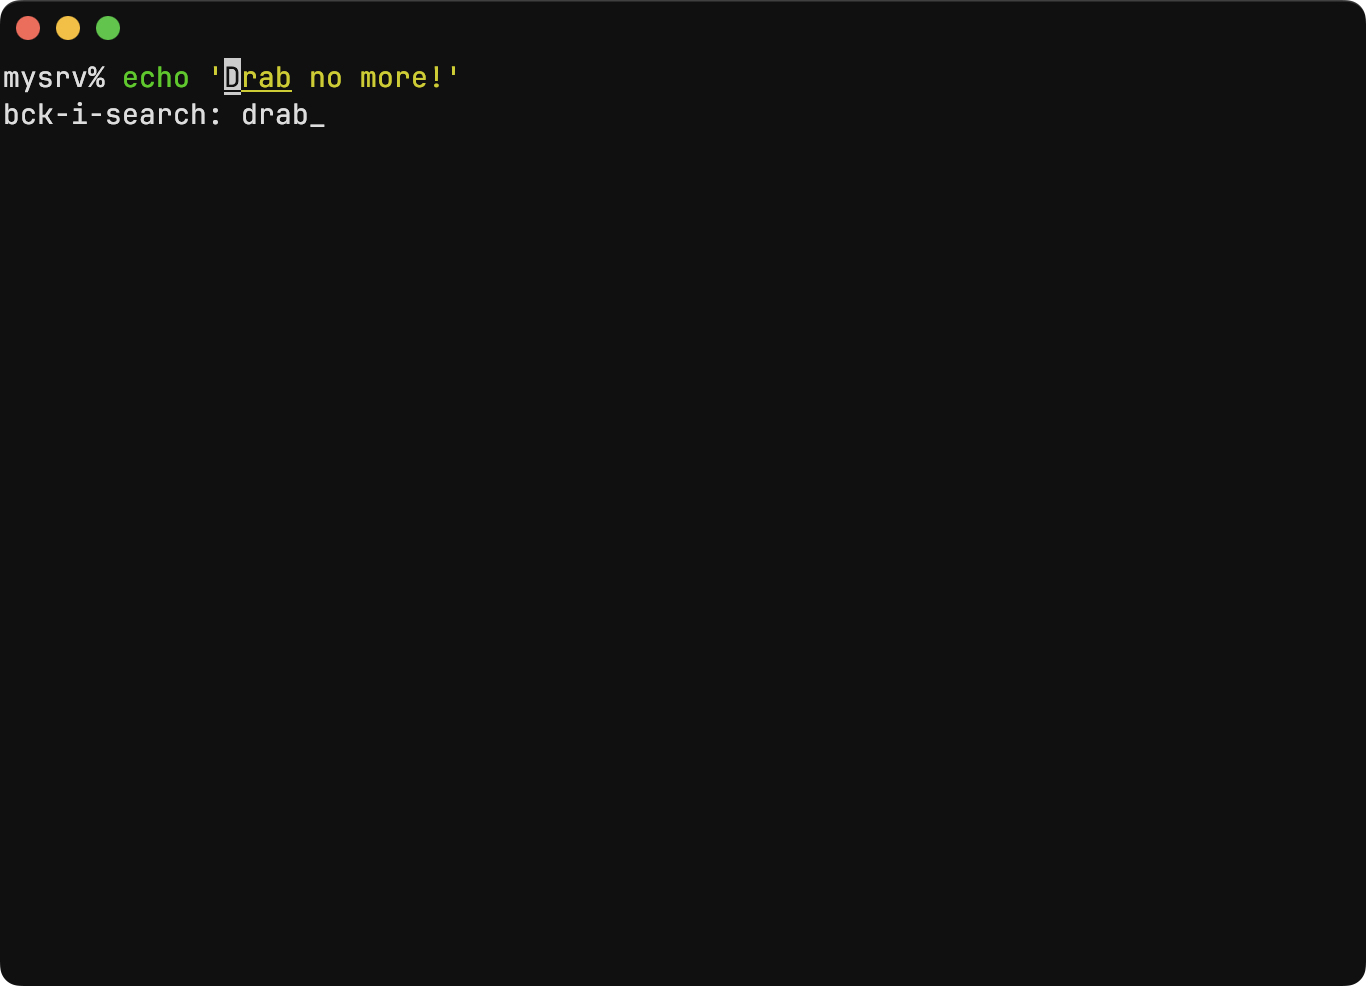
Default history search
Before we enable fzf, let’s check out the default history search and
search for our previous drab command. Press ctrl-r and
you’ll get a bck-i-search: prompt. Start typing and you’ll
see it match previous commands in history. So if you type
drab you’ll get a single match. If you know there’s another
different match, keep pressing ctrl-r and it will cycle
through other matches.
It’s better than nothing, but not great. If you have thousands of history entries, this makes it a bit challenging to dig through them. And I find there are two really annoying things about the default behavior:
- When you hit enter, the command is executed. I would expect it to simply pull it out of history and put it on the command line for me to edit first.
- It doesn’t cycle. If you’re pressing
ctrl-rquickly and go past what you want, pressctrl-cand start over.
Better History and File Search with fzf
fzf improves upon the default in a big way.
First, let’s install fzf.
pkg search fzffzf-0.66.1_1 Blazing fast command-line fuzzy finderpkg install fzf
Enable it in your .zshrc file.
# Enable fzf
eval "$(fzf --zsh)"
Source your .zshrc file. Then create a few history items
with “cat” in them to test things out.
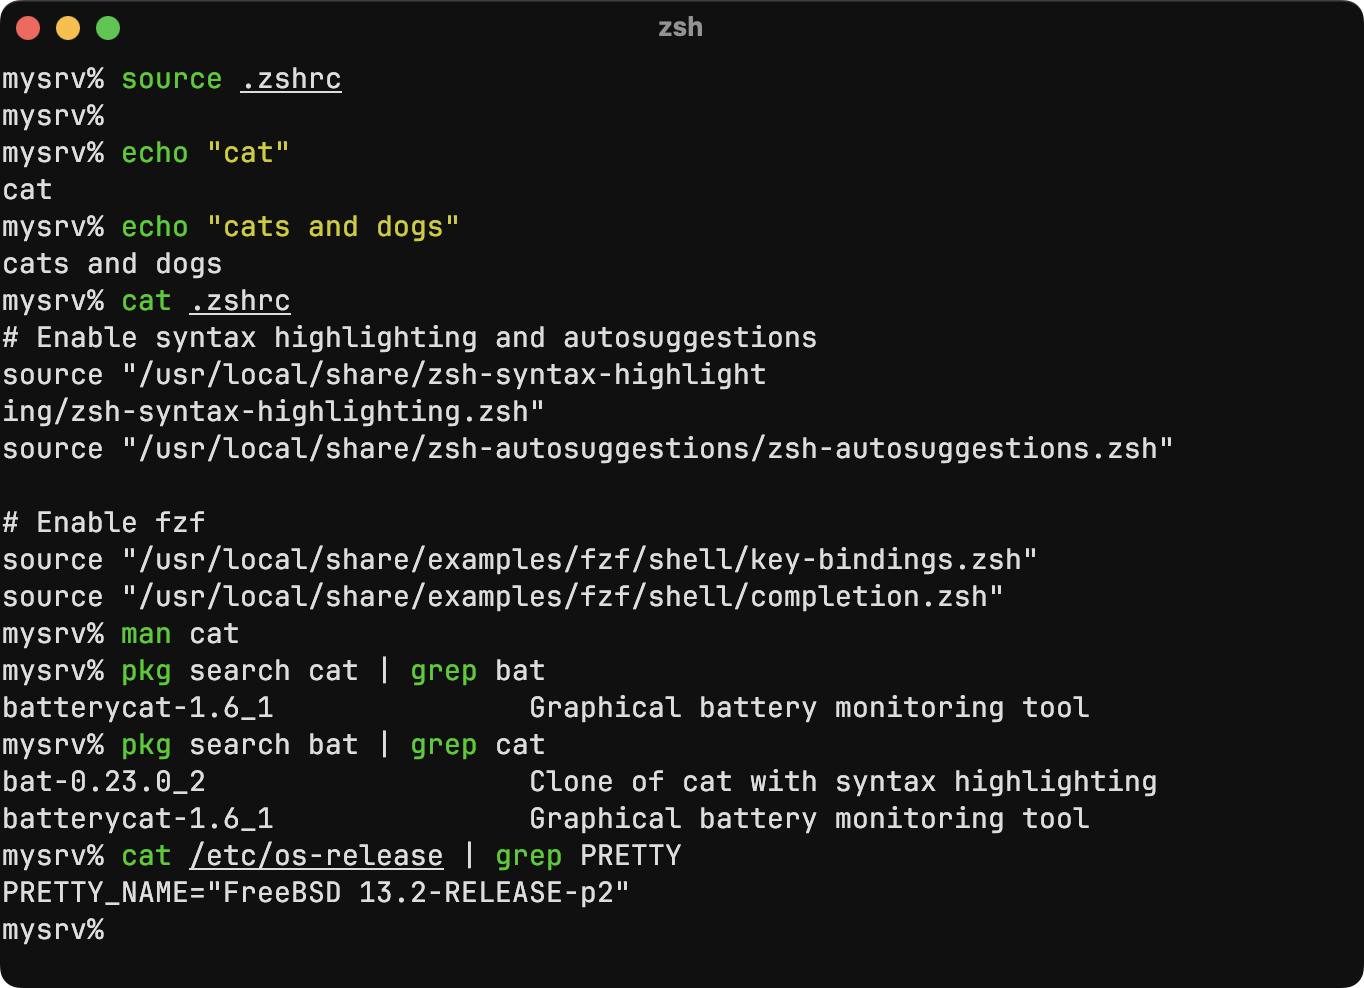
When we sourced our .zshrc file, we overrode default
ctrl-r functionality. Press ctrl-r and notice
the new fzf interface. Type “cat” and see several matches all at once.
Use the up and down arrow to selected matches, and enter to choose
one.
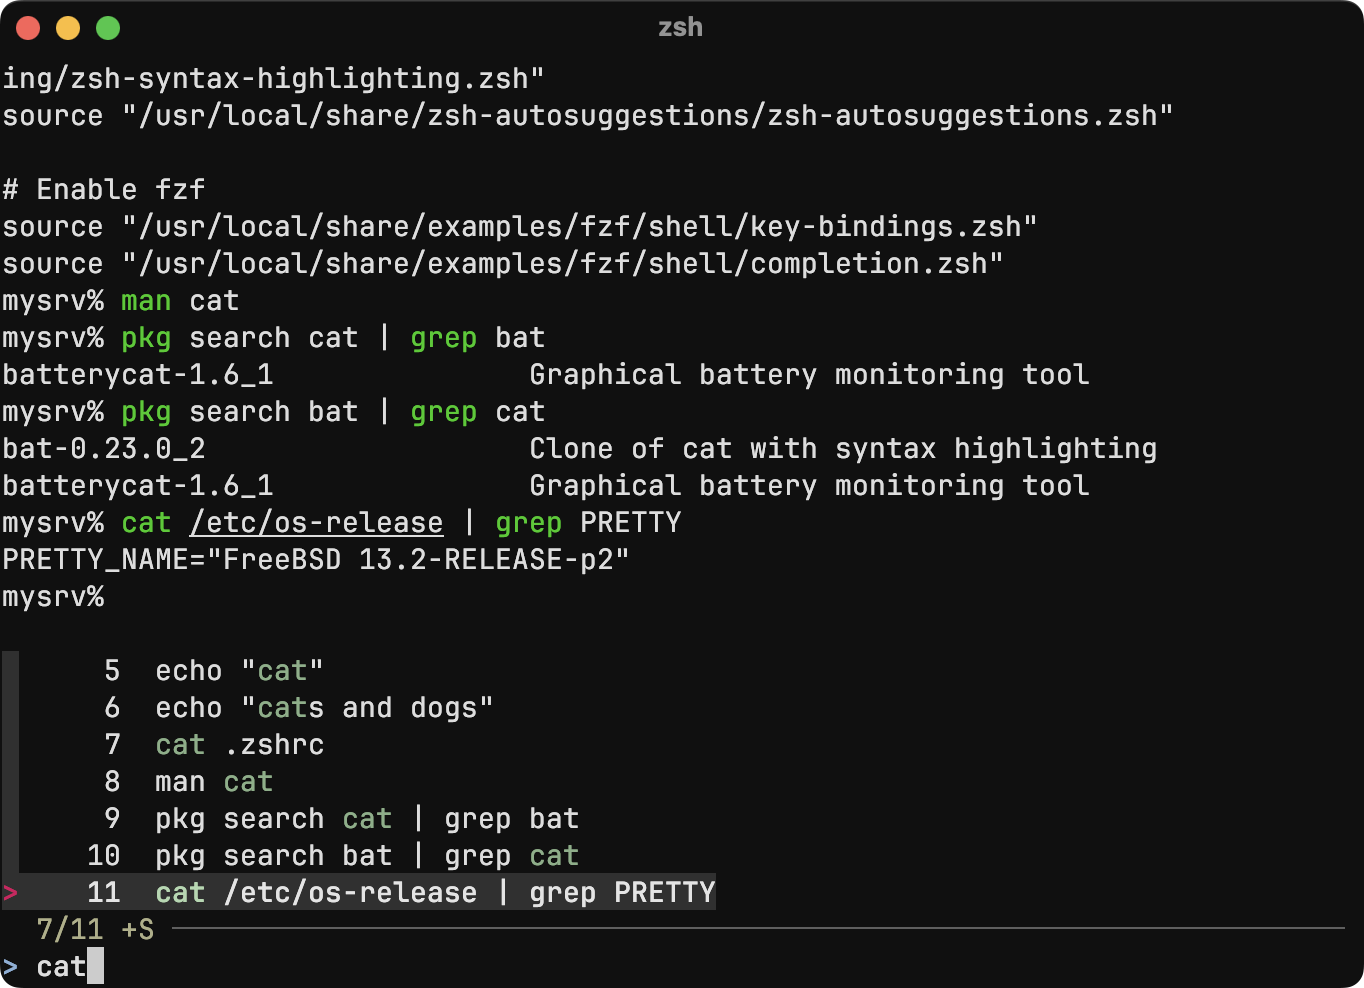
Pretty great, right? But wait, there’s more. Search for “cats” to see a fuzzier match.
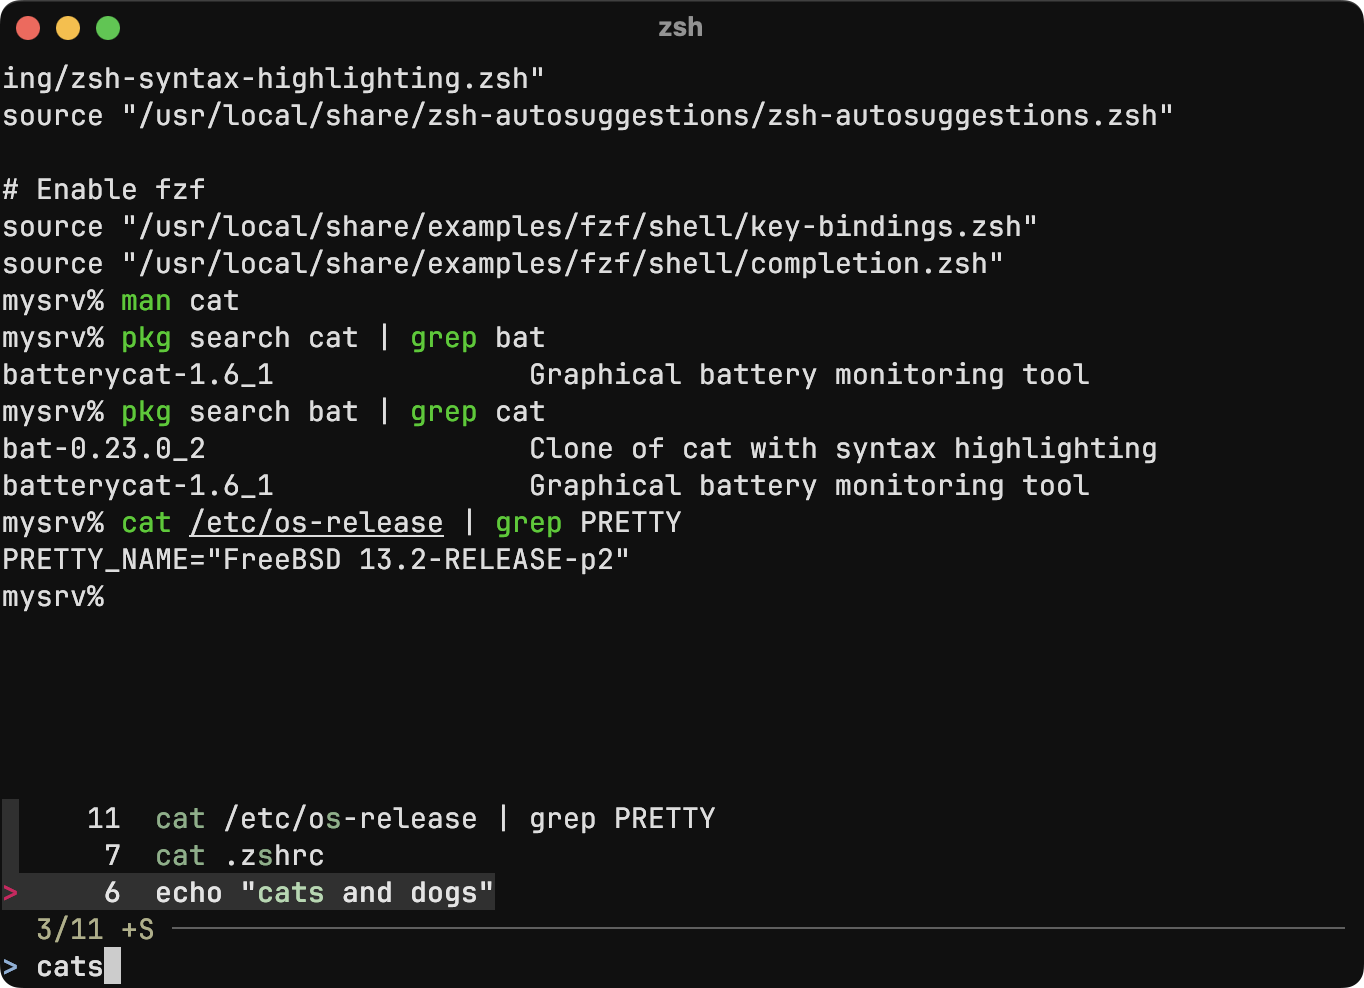
A few things to note. First, there’s only one command in our history
with the exact string “cats” and it is selected as the first match.
Other matches fit the regular expression /cat.*s/ so fzf
presents them, but puts them later in the list of matches as they’re
less likely.
As you accumulate thousands of lines of history, fzf becomes increasingly valuable. You’re sure to have the thought, “what was that command I ran?? I know I ran it and then grepped something and …” Whatever you can remember, you just type it and the match gets more and more relevant in real time. And because you can see several lines you can quickly scan the results until you find what you’re looking for.
There are other features to explore, but history search is the one I find by far the most useful. Check out the fzf github project for more insights.
zsh Prompt Tweaks
I left out colorizing the zsh prompt in the earlier zsh section as not to distract from the color offered by syntax-highlighting and fzf. But with those behind us, let’s customize our prompt.
A colorful prompt
I prefer to have a distinct visual marker for where the command prompt is/was. Especially when you’re on a large monitor, it makes it easy to glance back at what commands you executed. And in a later section when we have multiple panes with multiple prompts, it makes it quick and easy to find where to focus your attention.
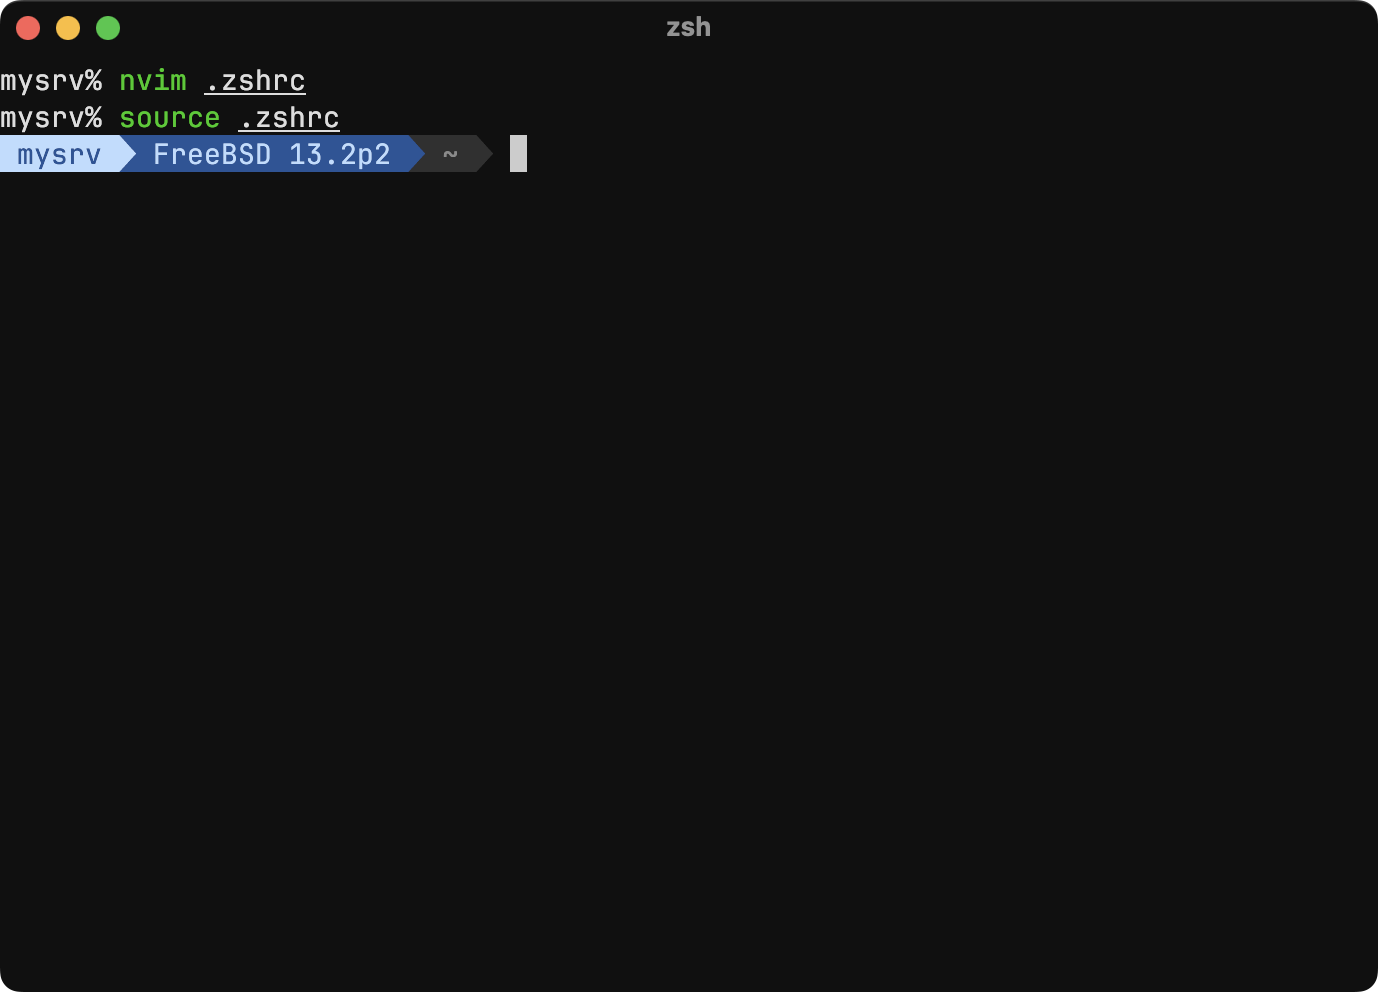
Amend your .zshrc with the follow to get a more sophisticated prompt.
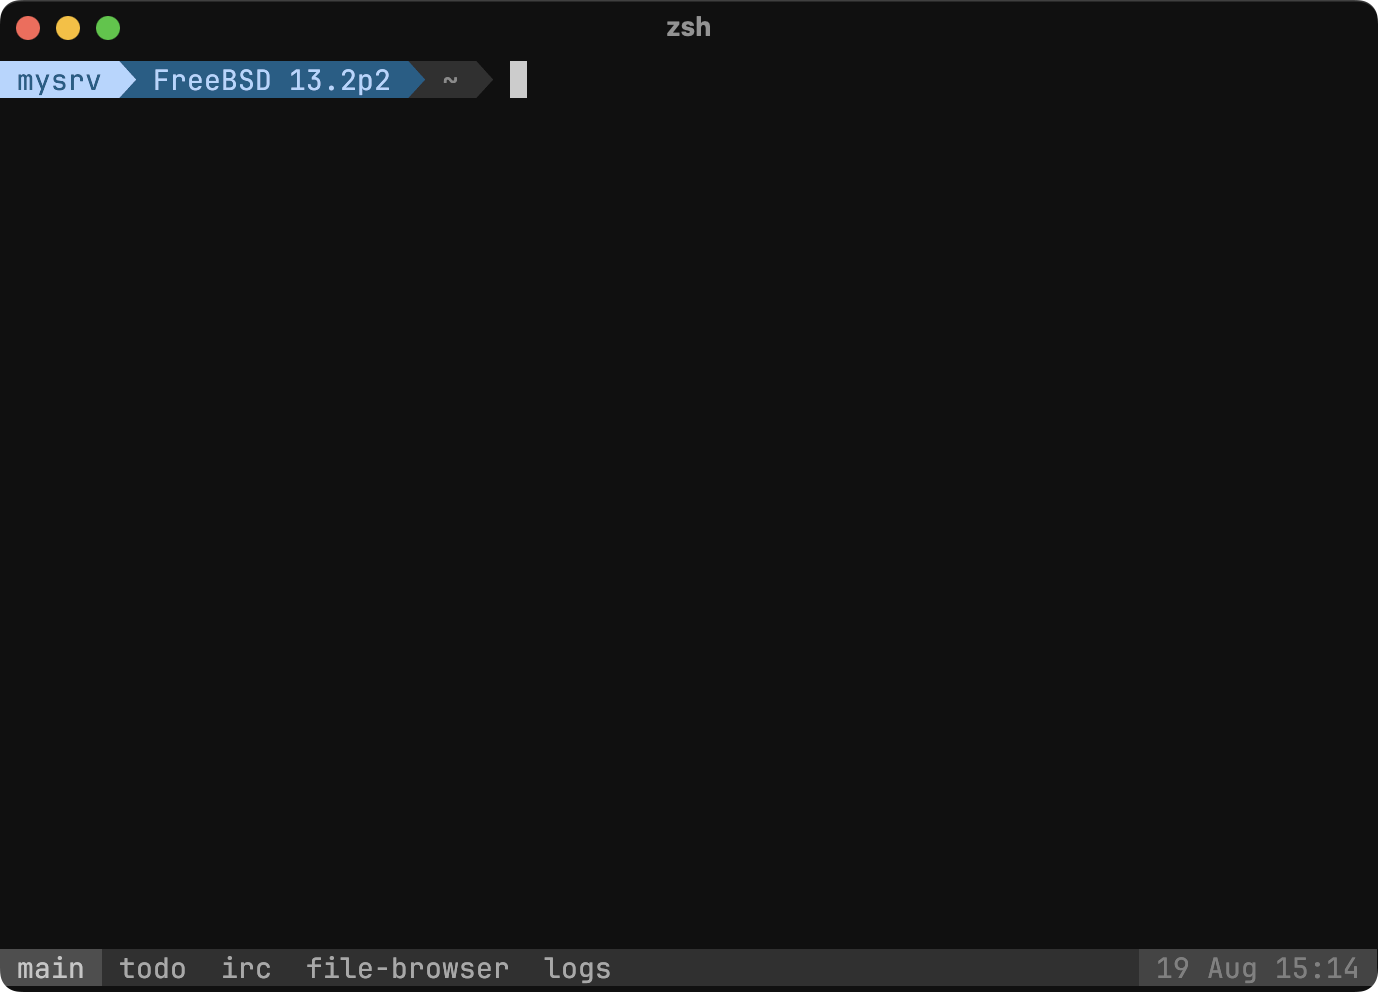
# A Colorful Prompt with OS Version
autoload -Uz colors
colors
bg1='#bdf'; bg2='#259'; bg3='236'
fg1='#259'; fg2='#bdf'; fg3='245'
os_version="FreeBSD $(freebsd-version | sed 's/-RELEASE-//')"
PROMPT_HOSTNAME="%K{$bg1}%F{$fg1} %m %K{$bg2}%F{$bg1}"
PROMPT_OS_AND_KERNEL="%K{$bg2}%F{$fg2}${os_version} %(!.%K{red}%F{$bg2}.%K{$bg3}%F{$bg2})"
PROMPT_DIRECTORY="%(!.%K{red}%F{white}.%K{$bg3}%F{$fg3})%3~ %(!.%k%F{red}.%k%F{$bg3}) "
PROMPT="${PROMPT_HOSTNAME} ${PROMPT_OS_AND_KERNEL} ${PROMPT_DIRECTORY}%f%k"
With those additions we source our .zshrc file and boom! Colors!
Note: That right-facing triangle character is not present in all fonts. I use JetBrains Mono NL, but you’ll find several other fonts that have it. If you see a weird or non-existent character, that’s the problem. If you need inspiration, Nerd Fonts offers fonts that include characters like this and many more that will allow you to take prompt customization to the extreme.
But what did all that mean? Let’s go through it.
autoload -Uz colors colors
This simply enables an easy way to change the color of the output,
e.g., %F{red} would make the foreground color of the text
that follows red. You can also use ANSI colors and RGB hex as well,
where equivalents for red would be %F{009} and
%F{#ff0000} (or %F{#f00}) respectively. Check
out ANSI
color codes or hex color
codes for details. In my file I’ve made use of both.
bg1='#bdf'; bg2='#259'; bg3='236' fg1='#259'; fg2='#bdf'; fg3='245'
These are colors I chose. They could be anything you like.
fg1 is foreground 1, bg1 is background 1. They
make up the three sets of colors we see on the prompt. If you prefix a
color with # then it’s a hex RGB code. If not, it’s a ANSI
256 color code (see link above for a list of the 256 colors).
These 6 definitions are all zsh variables. You’ll see later we’ll put
them into the color format, e.g., %F{$fg1} will be
interpreted as %F{#259}. I used variables as it makes going
back later and changing the colors easier.
os_version="FreeBSD $(freebsd-version | sed 's/-RELEASE-//')"
The freebsd-version command will return something like
13.2-RELEASE-p2, which is a bit longer than I’d like on the
prompt. The sed command shrinks it down to
13.2p2.
PROMPT_HOSTNAME="%K{$bg1}%F{$fg1} %m %K{$bg2}%F{$bg1}"
PROMPT_OS_AND_KERNEL="%K{$bg2}%F{$fg2}${os_version} %(!.%K{red}%F{$bg2}.%K{$bg3}%F{$bg2})"
PROMPT_DIRECTORY="%(!.%K{red}%F{white}.%K{$bg3}%F{$fg3})%3~ %(!.%k%F{red}.%k%F{$bg3}) "
These create the three portions of the prompt. They also use zsh
short codes to substitute specific information in, e.g., %m
becomes the hostname (see zsh
Prompt Expansion for details and other expansions). These also make
use of the previously defined colors.
PROMPT="${PROMPT_HOSTNAME} ${PROMPT_OS_AND_KERNEL} ${PROMPT_DIRECTORY}%f%k"
And lastly, we stitch all three together and set the prompt. There are a bazillion ways to configure a prompt. This is just one example, so play around and build whatever you like.
tmux: terminal multiplexer
A terminal multiplexer is essentially a way to make one terminal behave as if it is several. Moreover, a terminal multiplexer like tmux will continue to run even when you log off. So if you’re in the middle of something and need to stop working, you just detach and log off. When you log back on, you reattach to the session and it’s as if you never left.
Of all the tools that enhance my productivity, tmux probably has the most impact.
Install tmux
pkg search tmuxtmux-3.3a_1 Terminal Multiplexerpkg install tmux
To create a session, just type tmux
Default tmux is a bit ugly and not intuitive. It would seem all we
got is a bright green bar, but there is much more hidden away. First,
let’s start by exiting tmux. press ctrl-b then
x. You’ll see the green bar turn yellow and ask you to
confirm kill-pane 0 (y/n)?. Press y and you’ll
be out.
So what did we just do? tmux operates with two-step input: prefix +
command. The default prefix is ctrl-b. And x
is the key bound to the kill-pane command. In this case,
there was only 1 pane, so killing the only pane also killed tmux, and so
it exited.
I use a US ANSI keyboard, which means the ` (back-tick)
key is at the upper left of my keyboard. As this key is almost never
used, it makes a great single-key alternative to
ctrl-b.
We’ll configure our new tmux prefix in a .tmux.conf file
in our home directory. And while we’re there, we’ll give ourselves an
easy way to reload the config as we make changes.
# set prefix to '`', but keep 'ctrl-b' too
set -g prefix '`'
bind-key '`' send-prefix
set-option -g prefix2 C-b

# easy reload ~/.tmux.conf
bind-key r source-file ~/.tmux.conf
Save the file, and run tmux again. Everything should
look the same, but try hitting ` then x.
You’ll get the same kill-pane prompt as before. This time say
n and stay in tmux.
Hooray! One less key to press. And the way we set it up,
ctrl-b still works as an alternative. And we bound
r to source, or (r)eload, our config file. This way we
don’t have to quit/start tmux for each change we make, we just
` then r.
For the rest of the article I’ll write ` r instead of
“` then r” to be more concise.
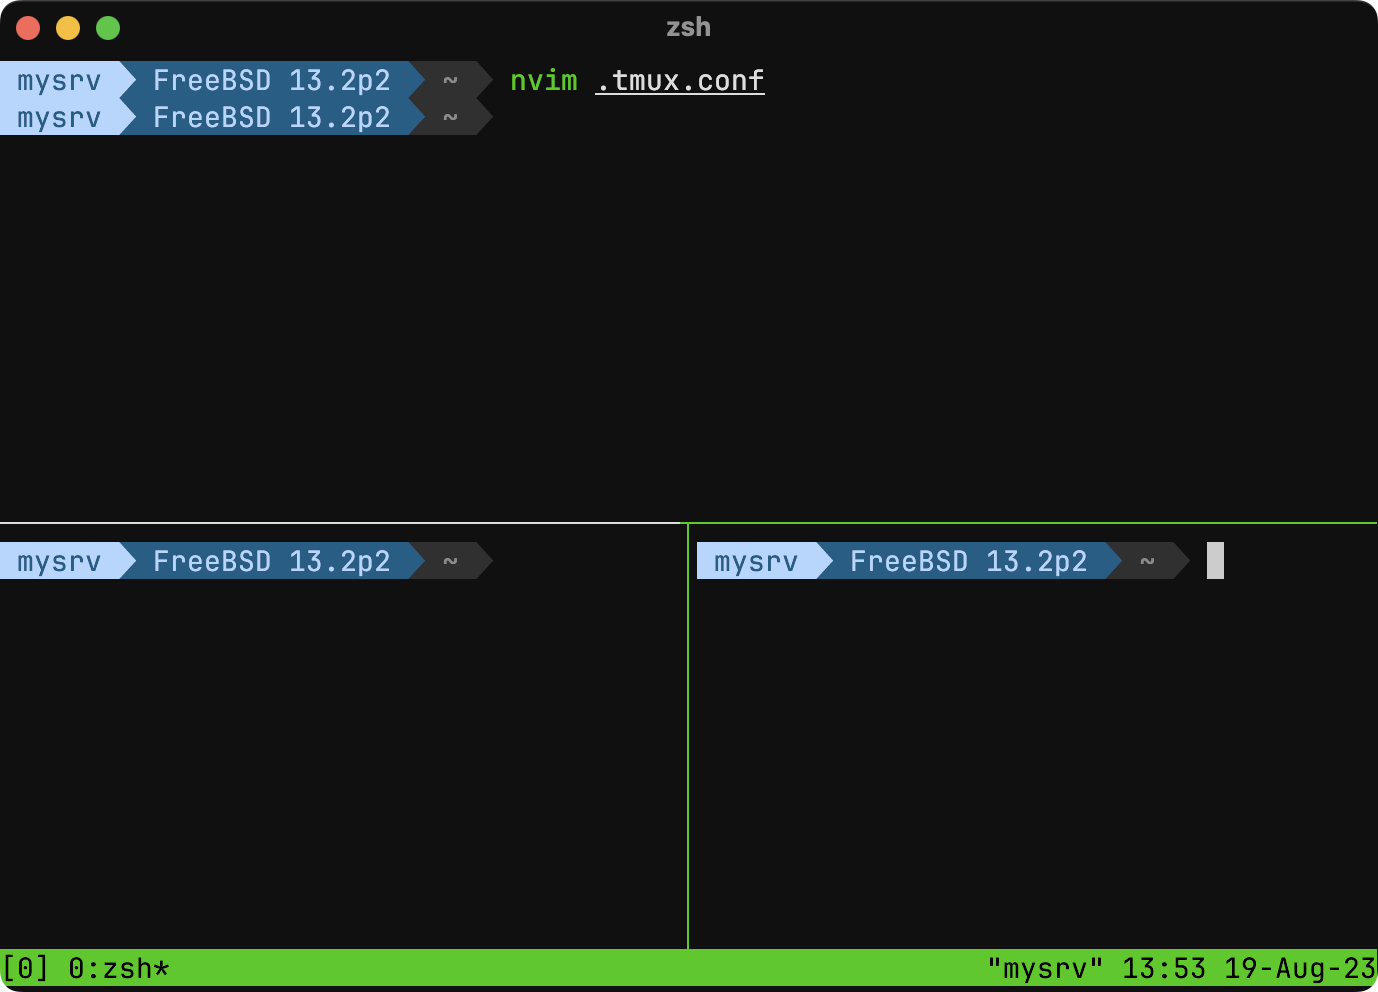
Panes
Let’s add a few more lines to our .tmux.conf config to
allow us to create and cycle through panes.
# split pane commands
bind-key | split-window -h -c '#{pane_current_path}'
bind-key - split-window -v -c '#{pane_current_path}'

# cycle through panes
set-option -g repeat-time 500 #milliseconds
bind-key -r p select-pane -t :.+
bind-key -r P select-pane -t :.-
After saving ` r to reload the config. Now try hitting
` - and then ` |. You should now have three
panes that you can cycle through by hitting ` p.
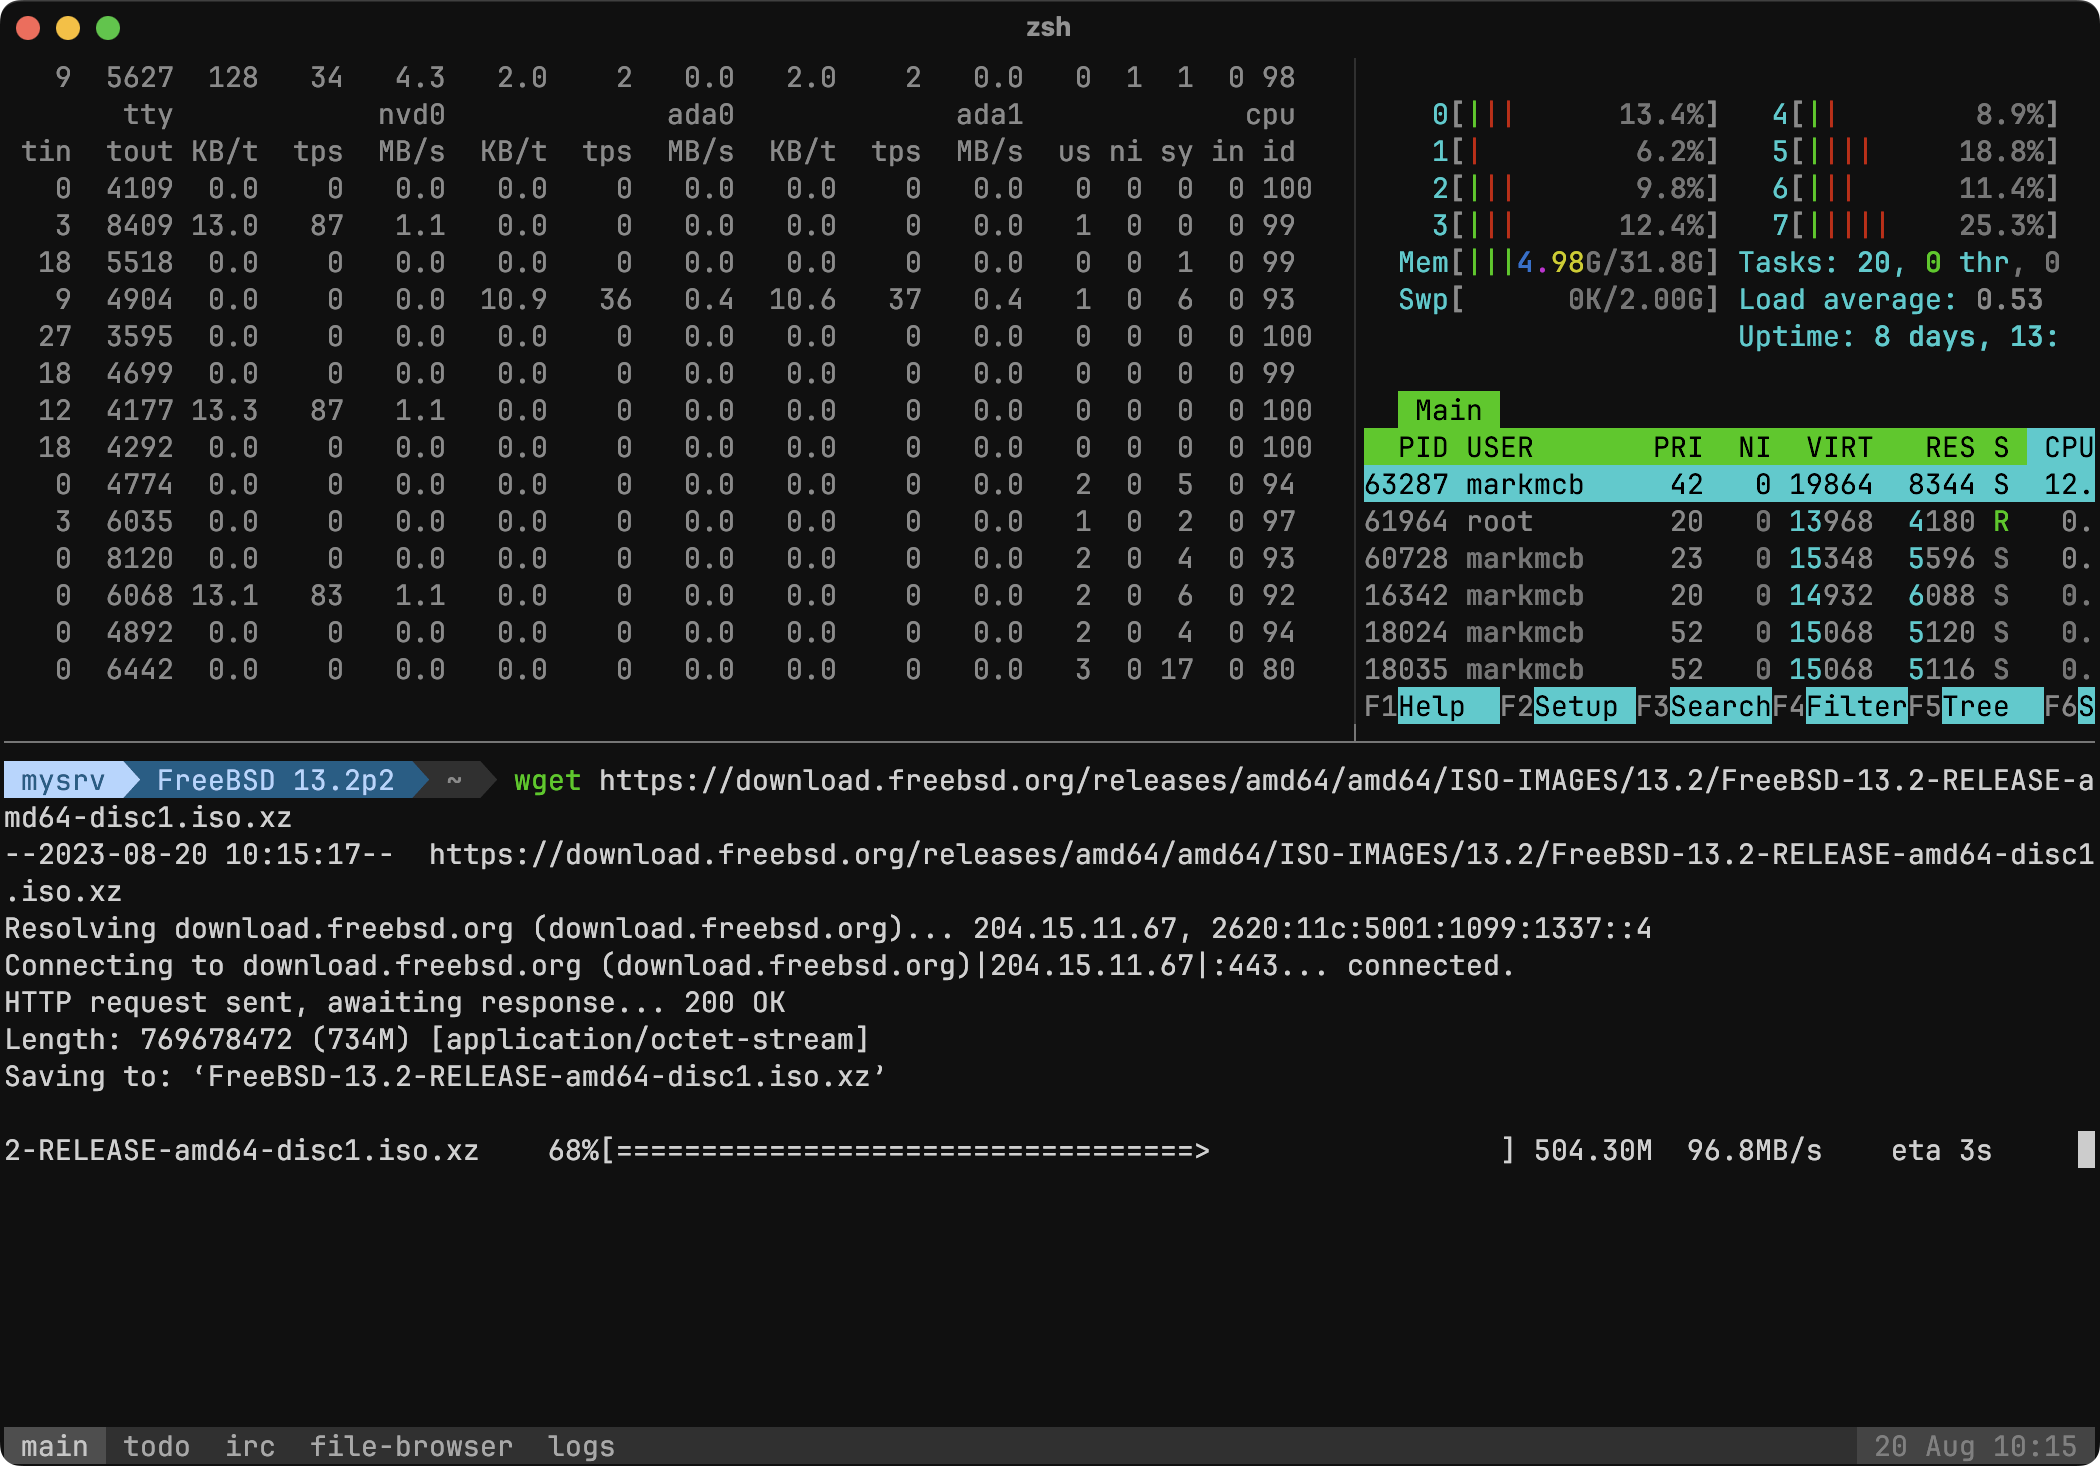
This is where tmux starts to become really powerful. Try starting a
few commands that don’t immediately exit. I’ll execute top
and iostat -w1, and also echo a string.
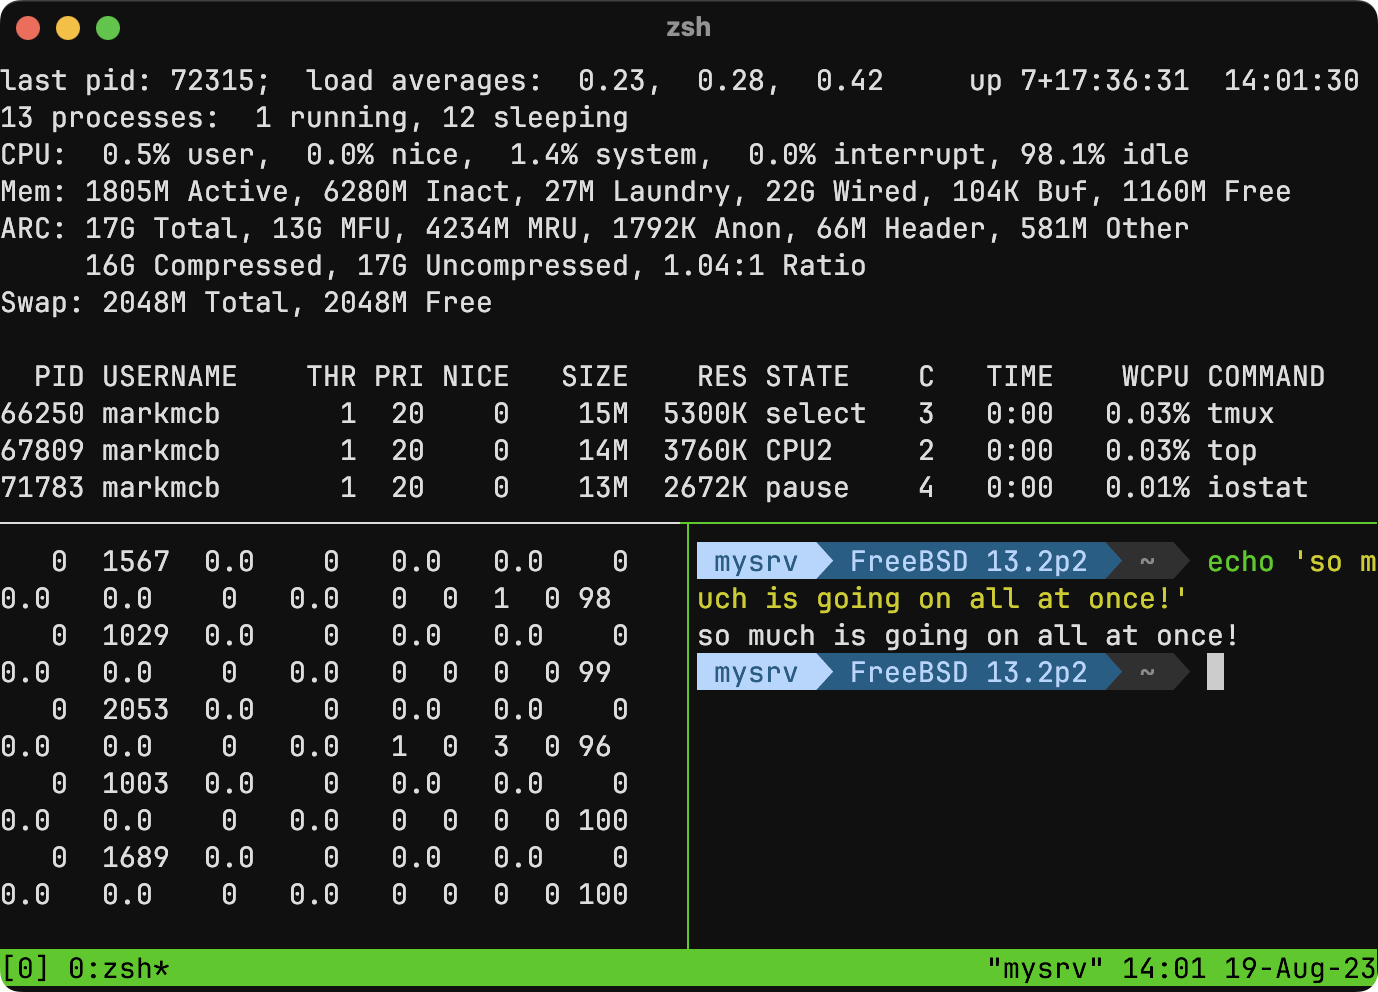
Now we’re starting to see the value of tmux. If you want to have
multiple views on the screen all at once, it solves the problem and
keeps the many views on the server side (i.e., you could open 3 terminal
windows and three connections to do the same thing, but that’s on the
client side). Now that we have multiple panes open, try out
` x again. This time it’ll kill whatever panes you have
active until only one remains.
Windows
If you like panes, you’ll love windows. See that cryptic
0:zsh* message at the bottom of the screen? That’s the name
of our window. Like panes, one window isn’t too exciting, but when you
have several it gets interesting.
Once again, let’s edit .tmux.conf.
# set window and pane index to 1 (0 by default) for easier direct access
set-option -g base-index 1
setw -g pane-base-index 1

# move between windows and sessions
bind-key -r h previous-window
bind-key -r j switch-client -n
bind-key -r k switch-client -p
bind-key -r l next-window
Normally we’d ` r after saving, but we need to kill all
of our panes for this one to fully work as we’re changing how panes get
numbered. To do that either ` x each pane, or type
tmux kill-server and you’ll be out of tmux. Then
tmux again to start once more.
This time when you start there’s a very subtle difference. That
0:zsh* at the bottom is now 1:zsh* because we
told tmux to count windows starting with 1. This will come in handy
because we can fast switch to windows by typing ` 1 or
whatever their number is.
Let’s create some windows. How about 5? Type ` c four
times to add four windows for a total of five.
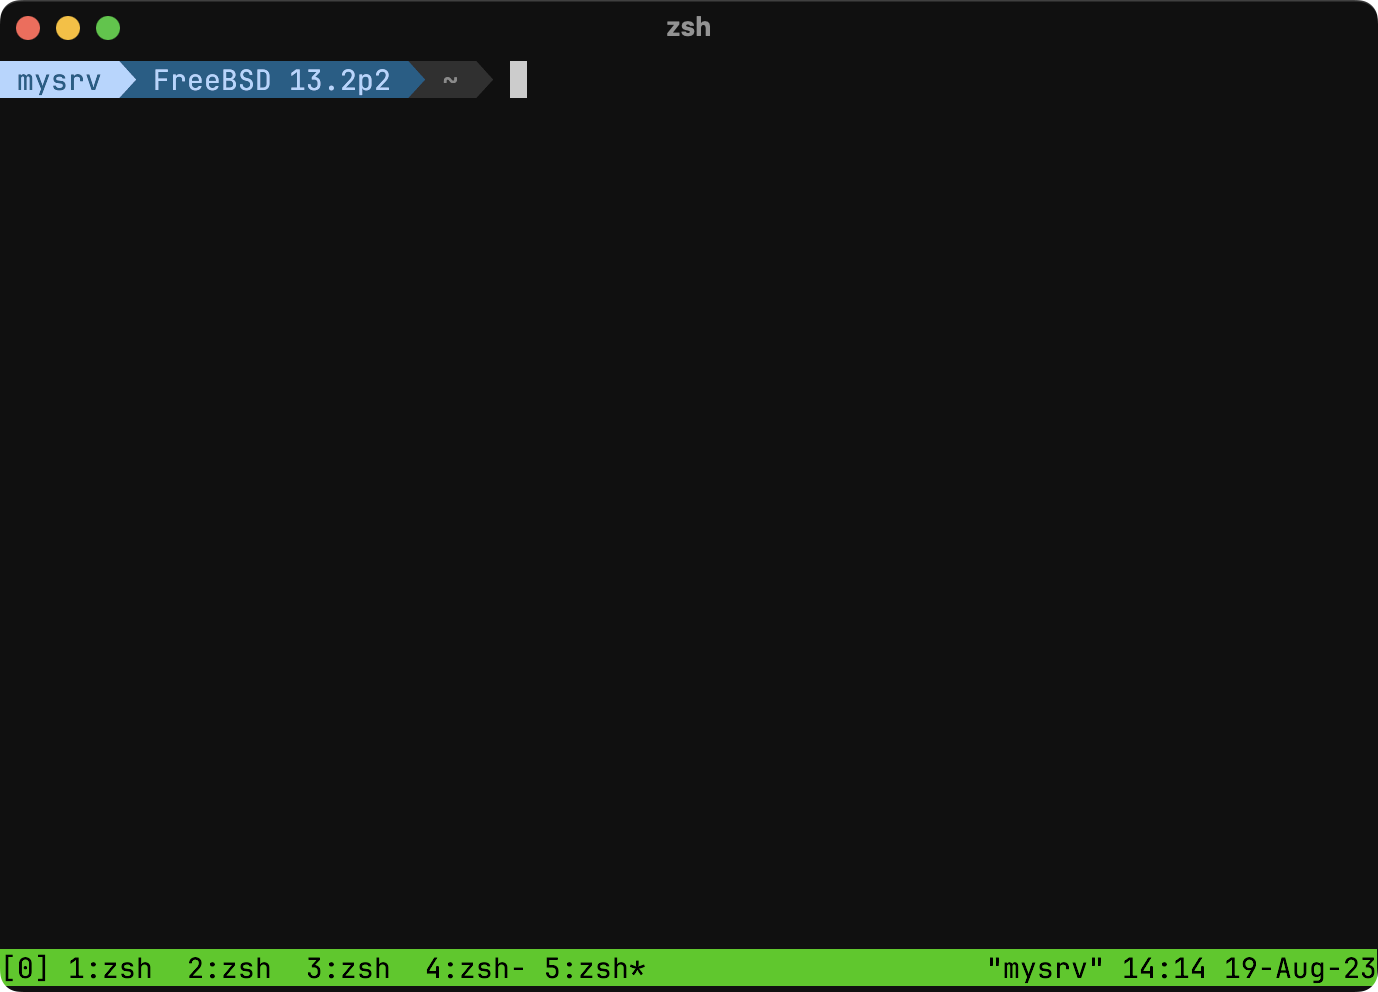
If all went well, you should see 5 windows listed in the green bar.
If you type ` 3 you’ll jump to window 3. Your visual cue is
the * next to the window name, i.e., you should see
3:zsh*.
It’s a bit confusing that all our windows are named the same. Let’s
rename them with ` , and give them descriptive names.

You can see now I’ve got a main window for various system administration, my todo list, a window for IRC chat, a window for a file browser, and a window to monitor logs. I haven’t actually set any of this up, so let’s call it a vision for now. :-)
Aside from using ` [number] to move around, we can use
our keybindings we added before to use vim-style
arrow keys. Try ` h to go left and ` l to
go right through the window list.
We also added the ability to use ` j and
` k to go through sessions, but we won’t cover that just
yet. If windows are collections of panes, then sessions are collections
of windows. You may never need more than one session, but if you do,
know they’re there.
Styling
Ok, so we have this new cool tool that is sure to enhance our productivity, but that green bar is just so … green. Let’s play with the style a bit.
# STYLE

# Pane seperation colors, i.e., lines between panes
set -g pane-active-border-style 'fg=colour243'
set -g pane-border-style 'fg=colour236'

# Brighter text for active window pane
set -g window-style 'fg=colour245'
set -g window-active-style 'fg=colour252'

# Add padding to window names, and visual flag for window activity
set-option -g window-status-format ' #W#{?window_activity_flag,!,} '
set-option -g window-status-separator ''

# Default gray on gray status bar style
set-option -g status-style bg=colour236,fg=colour248

# Inactive window labels match the color of the status bar
set-window-option -g window-status-style bg=colour236,fg=colour248

# Active window label is slightly highlighted. Append -Z if a pane is zoomed.
set-window-option -g window-status-current-style bg=colour24,fg=colour14
set-window-option -g window-status-current-style bg=colour239,fg=colour251
set-option -g window-status-current-format ' #W#{?window_zoomed_flag,-Z,} '

# Left status
set -g status-left "#[bg=colour239,fg=colour252]"

# Right status
set -g status-right "#[bg=colour238,fg=colour244] %d %b %H:%M "
With those tweaks, hit ` r and the green is no more! The
comments explain what each line does, but if it’s not clear, check out
tmux(1) for
details.
I find this much easier to look at compared to the default, but play with the configs and find a look and feel you like.
Mouse and Scroll
Ok, so we’re looking good. One last (optional) thing to do: mouse support. If you’re like me, you almost always interface with a shell via a terminal emulator in a desktop environment. All of the screenshots have been exactly that, kitty running in macOS and connected to a FreeBSD remote. If you’re in a desktop environment, you probably have a mouse. Let’s enable it.
# MOUSE

# Enable mouse support by default, but make it easy to turn on/off
set-option -g mouse on
bind-key m set-option -g mouse

# If you have sessions, and put #S in the status bar, click or
# scroll on the session name to cycle through sessions
bind-key -n MouseUp1StatusLeft switch-client -n
bind-key -n WheelDownStatusLeft switch-client -n
bind-key -n WheelUpStatusLeft switch-client -p

# increase scrollback
set-option -g history-limit 50000
Save and ` r and then run
for i in $(seq 1000); do echo "$i"; done to have your shell
count to 1000 with one number on each line. Now grab your mouse and
scroll up.
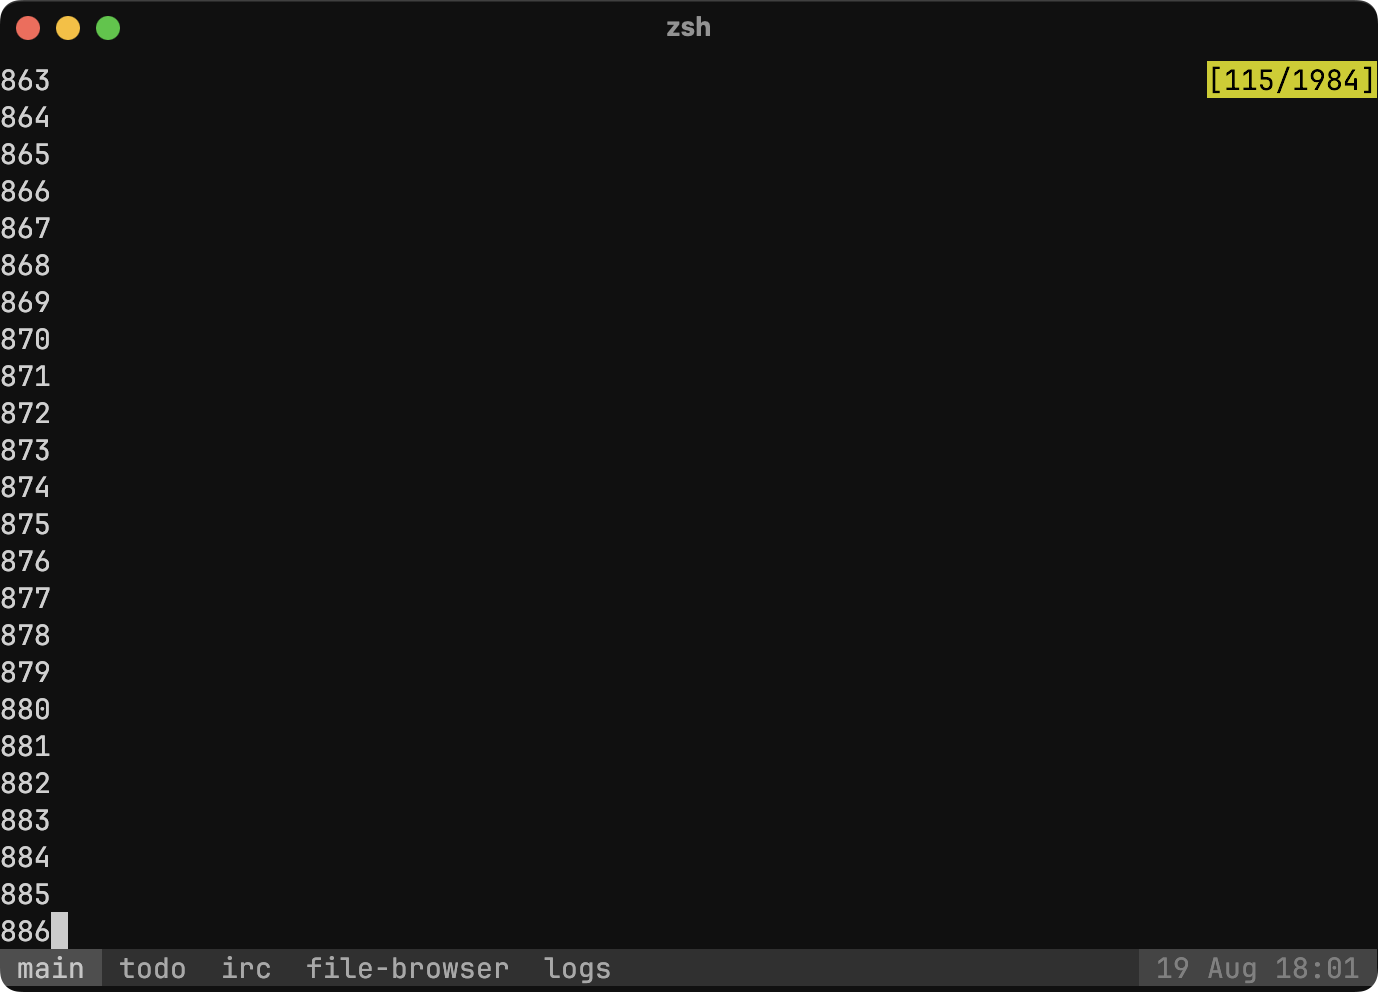
If all went well you’ll happily scroll up through the tmux scroll-back history (which we just set to 50000 lines). You’ll see the yellow status indicator appear telling you where you are and how many total lines tmux is tracking.
To get back to a prompt, either scroll back down, or type
q.
A few final notes on tmux
This article isn’t meant to be a comprehensive tmux guide, but a few points worth noting:
` dis how you detach from tmux.tmux ais short fortmux attachand will attach you to an existing tmux session` Dwill let you detach any client, i.e., if you were attached at home and didn’t detach, you could detach your home connection from your phone or wherever.` zwill “zoom” a pane, i.e., if you’re looking at 4 panes and temporarily want one to be full screen, zoom it
I’ve added some scripting into my .zshrc to
automatically look for and attach to tmux sessions when I log in.
Integrating tmux into your workflow like this can be really powerful.
Check out the tmux docs for all the options you need to get started.
Wrapping it all up
Let’s revisit on our original complaints about the default CLI on most systems.
no command suggestions based on historySolved withzsh-autosuggestionsbasic history search (ctrl-r)Solved withfzfif log off everything you’re doing must stopSolved withtmuxlimited color and visual hooksSolved withzsh-syntax-highlightingand prompt tweakssingle viewSolved withtmux
What Next?
There are many other things to consider, but some suggestions:
zsh-completionsenables powerful completions of commands and is highly configurable. Check out this guide.tmuxcan run executable scripts and put their outputs in the status bar. On my system I have scripts that monitor cpu/ram/temps, and also occasionally check for updates and put an indicator with how many are available.tmuxhas sessions for further organizing your work. I have a second session running for my FreeBSD jails that I rarely interact with. This keeps them tucked away out of sight, but when I do need them they’re just a` jawayrgandbatare nice replacements for the standardgrepandcat. I use rg/bat on the CLI, but stick with grep/cat in scripts for portability.
… so many other tweaks and options. I hope you find them all. Happy hacking!

(In case you don’t know your memes.)